Gorilla Trekking Photography 2026: Tips, Gear & Rules
TL;DR
Gorilla trekking photography is one of the most challenging wildlife photography scenarios on earth: you get one hour, in a dark rainforest, with strict rules about flash and distance, shooting a black-furred subject that moves unpredictably. This glossary covers every term you need to know, from the consensus gear pick (70-200mm f/2.8) to the camera settings that actually work (ISO 800-3200, aperture priority, exposure compensation dialed to -1 or -2), the regulations that will get your camera confiscated if you break them, and the composition techniques that separate snapshots from portfolio images.
Gorilla Trekking Photography: Best Camera Settings & Gear (Quick Answer)
If you only remember three things for gorilla trekking photography, remember these:
- Bring a fast zoom lens, ideally a 70-200mm f/2.8 - Shoot in Aperture Priority mode with exposure compensation set to -1 or -2 - Use ISO 800-3200 and keep shutter speed above 1/250 second
The rainforest is dark, humid, and unpredictable. Flash photography is banned, tripods are impractical, and your encounter lasts only one hour. Most photographers succeed by prioritizing fast lenses, stable handheld shooting, and accurate exposure for black fur subjects.
For beginners, the best setup is:
|
Setting |
Recommended Starting Point |
|---|---|
|
Mode |
Aperture Priority |
|
Aperture |
f/2.8 to f/4 |
|
ISO |
800-3200 |
|
Shutter Speed |
1/250 minimum |
|
Exposure Compensation |
-1 to -2 |
|
Autofocus |
Continuous AF + Eye AF |
|
Drive Mode |
Burst Mode |
|
Flash |
OFF |
The best photos usually happen when the gorillas ignore you completely. Stay calm, shoot deliberately, and wait for eye contact moments rather than spraying hundreds of frames.
Why Gorilla Photography Demands Its Own Vocabulary
Most wildlife photography happens in open savannas with abundant light and long telephoto lenses. Gorilla trekking photography throws all of that out the window. You are standing on a steep, muddy hillside under a dense forest canopy that swallows light. Your subject has jet-black fur that confuses every camera meter ever built. You have exactly 60 minutes before a ranger taps your shoulder. And the single most useful piece of gear in most wildlife photography, an external flash, is completely banned.
This combination of constraints means that gorilla photography has its own specialized language, blending camera terminology with trekking regulations and primate behavior concepts. Whether you are packing for your first trek or reviewing your settings the night before, this glossary puts every critical term in one place.
Planning a gorilla trek and want the permits and logistics handled? Check out our gorilla trekking Uganda guide for costs, permits, and practical tips.
Camera Gear Glossary
70-200mm f/2.8 Lens
The consensus pick among gorilla trekking photographers. Practitioners on photography forums are nearly unanimous: this is the one lens to bring. The focal range covers both tight portraits of a silverback’s face and wider compositions showing a gorilla family interacting. The f/2.8 maximum aperture is critical because it lets in enough light to shoot under the forest canopy without pushing ISO to extreme levels. If you own only one professional lens and you are going gorilla trekking, this is it.
Wide Aperture (f/2.8)
An aperture of f/2.8 means the lens diaphragm opens wide, allowing more light to hit the sensor. In gorilla photography, this matters for two reasons. First, the forest floor is shaded and dim, so you need every photon you can get. Second, a wide aperture blurs the background vegetation into soft, colorful smudges that isolate the gorilla from the chaos of leaves and vines behind it.
That said, experienced practitioners on DPReview forums note a useful nuance: shooting at f/3.2 or f/4.0 often produces better results than shooting wide open. At f/2.8, only one eye may be in focus. At f/4.0, most of the gorilla’s head stays sharp, which makes for a stronger portrait. The “always shoot wide open” advice is a useful starting point, not an absolute rule.
Crop Sensor Camera
A camera with a smaller-than-full-frame sensor (APS-C or Micro Four Thirds). The smaller sensor provides a “crop factor” that effectively extends your focal length. On a Nikon crop body, a 200mm lens behaves like a 300mm equivalent. On Canon APS-C, it becomes roughly 320mm. This extra reach can be valuable when gorillas are resting at the far edge of a clearing and you cannot move closer due to the 7-meter rule.
Image Stabilization (IS / VR / OSS)
A system built into lenses or camera bodies that counteracts hand shake. Since tripods are typically not allowed on gorilla treks, you are shooting handheld in dim conditions. Image stabilization can give you an extra two to four stops of usable shutter speed, which is the difference between a sharp image and a blurry one when your ISO is already maxed out.
Animal Eye Autofocus (Animal Eye AF)
A feature found on modern mirrorless cameras (Sony, Canon, Nikon) that automatically detects and locks focus on an animal’s eye. If your camera has it, turn it on before you start hiking. If it doesn’t, switch to single-point autofocus mode so the camera focuses exactly where you tell it, not on a branch or leaf in front of the gorilla’s face. A gorilla portrait lives or dies on whether the eyes are sharp.
Mirrorless Camera
A camera system without a mirror box, using an electronic viewfinder instead. Mirrorless bodies offer three advantages for gorilla trekking photography: better low-light autofocus performance, superior electronic viewfinders that show exposure in real time, and silent shooting modes that eliminate the mechanical shutter clack that might startle nearby gorillas. The weight savings over a DSLR also help on a multi-hour jungle hike.
Weather Sealing
Rubber gaskets and seals built into a camera body and lens to resist moisture and dust intrusion. You are trekking through a tropical rainforest. It will probably rain. A weather-sealed body gives you confidence to keep shooting when conditions deteriorate, though it is not a substitute for a dedicated rain cover.
Rain Cover
A waterproof sleeve or pouch that fits over your camera and lens, protecting them from sustained rain. Bring one. Even if the forecast is clear, clouds roll over the Virungas with little warning, and the montane forests of Bwindi can shift from mist to downpour in minutes. A basic nylon rain cover weighs almost nothing and costs under $20.
Make sure your gorilla trekking packing list includes rain covers for both your camera and your daypack.
Best Cameras for Gorilla Trekking Photography
Modern mirrorless cameras have dramatically improved gorilla trekking photography because they handle low light, autofocus, and silent shooting far better than older DSLR systems.
Here are the most commonly recommended camera types for gorilla trekking:
|
Camera Type |
Best For |
Advantages |
Drawbacks |
|---|---|---|---|
|
Full-Frame Mirrorless |
Serious photographers |
Excellent low-light performance, fast autofocus, better dynamic range |
Expensive |
|
APS-C / Crop Sensor |
Budget-conscious travelers |
Extra telephoto reach, lighter gear |
Slightly worse high ISO performance |
|
DSLR |
Existing DSLR owners |
Long battery life, durable bodies |
Heavier and slower autofocus |
|
Smartphones |
Casual travelers |
Great for close encounters and video |
Weak low-light performance |
Recommended Gorilla Trekking Camera Features
Prioritize these features over megapixels:
-
Strong high-ISO performance
-
Weather sealing
-
Fast autofocus tracking
-
Animal Eye AF
-
In-body image stabilization
-
Silent shooting mode
-
Lightweight body for long hikes
Is Full Frame Worth It for Gorilla Trekking?
Yes, especially in Bwindi’s darker forests. Full-frame cameras handle ISO 3200-6400 much more cleanly than crop sensor cameras, which matters because flash is prohibited and forest light changes constantly.
That said, crop sensor bodies can actually help with reach. A 70-200mm lens on APS-C effectively behaves more like a 300mm lens, which is useful when gorillas stay deeper in vegetation.
Camera Settings Glossary
ISO (Sensor Sensitivity)
ISO controls how sensitive your camera’s sensor is to light. Higher numbers mean more sensitivity but also more digital noise (grain). For gorilla trekking photography, start at ISO 800-1600 and expect to push to 3200 or higher in darker pockets of the forest. Modern cameras handle high ISO remarkably well, and a slightly noisy sharp image is always better than a clean blurry one.
Shutter Speed
The length of time the shutter stays open. Gorillas feed, groom, play, and move through vegetation unpredictably. Aim for a minimum of 1/250 second to freeze their movement. Anything slower risks motion blur, especially when a juvenile is tumbling or a silverback is mid-chest-beat. If your shutter speed drops below 1/250, raise the ISO rather than accepting a blurry frame.
Aperture Priority Mode
A semi-automatic shooting mode where you set the aperture and the camera selects the appropriate shutter speed. This is the go-to mode for gorilla photography because light under the canopy changes constantly. One second you are in deep shade, the next a shaft of sunlight breaks through. Aperture priority lets you maintain control over depth of field while the camera handles the rapid exposure adjustments.
Exposure Compensation
A setting that tells the camera to make the image brighter or darker than what its meter suggests. This is arguably the most underrated setting for gorilla trekking photography. Camera meters are designed to render everything as medium grey. When they see a dark gorilla in a dark forest, they overcompensate, making the black fur look grey and washing out the image.
Professional gorilla photographers routinely dial exposure compensation to -1 or even -2 to counteract this. One experienced primate photographer notes that exposure compensation requires more aggressive adjustment during gorilla encounters than in any other wildlife scenario because of the combination of very dark fur and rapidly shifting forest light. Check your histogram between shots and adjust as needed.
White Balance
The setting that tells the camera how to interpret color temperature. Rainforests are overwhelmingly green, and this can confuse automatic white balance, adding a green or blue cast to the gorilla’s black fur. Shooting in RAW format gives you full control to correct white balance in post-processing. If you shoot JPEG, try setting white balance to “cloudy” as a starting point, which adds a touch of warmth.
Burst Mode (Continuous Shooting)
A mode where the camera takes multiple frames per second for as long as you hold the shutter button. Use burst mode whenever gorillas are moving, playing, or interacting. Gorillas blink, turn their heads, and shift position rapidly. Firing a burst of 5 to 10 frames gives you the best chance of capturing the one frame where eyes are open, expression is engaged, and composition is right.
Continuous Autofocus (AF-C / AI Servo)
An autofocus mode that continuously adjusts focus as the subject moves. Standard single-shot autofocus locks when you half-press the shutter and then stops adjusting. Continuous autofocus keeps tracking, which is essential when a gorilla is walking toward you, feeding, or a baby is climbing on its mother’s back. Pair this with animal eye AF if your camera supports it.
Auto ISO
A mode where the camera automatically adjusts ISO within boundaries you define. Set a minimum shutter speed of 1/250 and a maximum ISO of 6400 (or whatever your camera handles cleanly). The camera will raise ISO as needed to maintain that shutter speed. This is a practical approach for gorilla trekking because you rarely have time to adjust three settings simultaneously while a silverback is staring you down.
Composition and Technique Glossary
Eye Contact Shot
The most powerful gorilla portrait is one where the animal is looking directly at the camera. When a silverback or a mother gorilla makes eye contact, ensure your focus point is locked exactly on the nearest eye. If the eye is sharp, the entire photo feels alive, even if the ears or shoulders are slightly soft. Wait for these moments rather than firing continuously at the back of a gorilla’s head.
Environmental Portrait
A wider composition that shows the gorilla within its forest habitat, branches, ferns, mist, and volcanic slopes included. While tight portraits are dramatic, environmental shots tell the story of where these animals live. Include a few in your session. They are also easier to compose because they don’t require pinpoint focus on a single eye.
Eye-Level Shooting
Getting low so your camera is at the same height as the gorilla’s eyes. This perspective makes the animal appear more imposing and creates a stronger emotional connection between viewer and subject. It also helps separate the gorilla from the background by changing the angle of the vegetation behind it. On steep slopes, this sometimes means crouching or even sitting on the ground.
Bokeh (Background Blur)
The quality and amount of blur in out-of-focus areas of an image. In gorilla photography, the background is almost always a tangle of leaves, vines, and branches. The more you can blur this clutter, the more the gorilla pops from the frame. Bokeh is controlled by aperture (wider is more blur), focal length (longer is more blur), and distance to subject (closer is more blur). At 200mm and f/2.8, you can turn a chaotic jungle backdrop into a smooth wash of green.
The “Camera Down” Technique
Counter-intuitive but backed by practitioner experience: spend at least 10 minutes of your hour with the camera turned off. One experienced guide recommends this specifically for gorilla trekking photography, arguing that observation time helps you understand the gorillas’ movement patterns and rhythms. When you pick the camera back up, you will anticipate moments rather than react to them. Fifty focused minutes beats sixty frantic ones.
Post-Processing and Noise Reduction
Editing your images after the trek using software like Adobe Lightroom or Photoshop. High-ISO gorilla images will have visible noise (grain), and modern AI-powered noise reduction tools in Lightroom can clean these up dramatically without losing detail. Adjust exposure, shadows, and white balance, but avoid over-editing. Heavy-handed processing strips the authenticity from wildlife images. The goal is to enhance what was there, not invent what wasn’t.
Trekking Rules and Regulations Glossary
Understanding the rules is not optional. Rangers enforce them strictly, and violations can end your trek early. For a full breakdown of what’s expected, see our guide to gorilla trekking safety rules.
Flash Photography Ban
The single most critical photography rule. Flash triggers defensive or startled reactions in gorillas, especially dominant silverbacks and young juveniles. The sudden burst of light can provoke a charge or cause the family to flee into denser bush, ruining the experience for everyone. Turn off your flash before you leave the trailhead. Rangers may check your camera settings during the pre-trek briefing.
7-Meter Rule (Minimum Distance)
Trekkers must maintain a minimum distance of 7 meters (roughly 23 feet) from the gorillas at all times. In practice, this rule is often impossible to maintain perfectly. Gorillas do not follow it. Baby gorillas sometimes walk right past visitors, and a silverback may move toward the group during feeding. If a gorilla approaches you, hold your ground quietly rather than backing away. This is also why a 600mm lens is overkill: at 7 meters, a 200mm lens gives you tight framing without needing extreme telephoto reach.
One-Hour Viewing Limit
Every gorilla trekking permit worldwide grants exactly one hour with the gorilla family. The clock starts when the lead ranger says “time begins” and ends precisely 60 minutes later. Group size is capped at eight visitors per gorilla family per day. Because you have so little time, you cannot afford to fumble with settings or lens changes once you arrive. Every camera decision should be made before the encounter starts.
Gorilla Trekking Permit
A legal document required to visit habituated gorilla families. In Uganda, the standard permit costs $800 for foreign non-residents. Rwanda charges $1,500. The DRC has the lowest prices at $400. Uganda also offers a low-season discount of $600 during April, May, and November. Permits must be booked well in advance, as daily visitor numbers are strictly limited.
For a detailed breakdown of permit costs and booking logistics, see our Bwindi gorilla trekking guide.
Gorilla Habituation Experience (GHE)
A special program available only in the Rushaga sector of Bwindi Impenetrable National Park. Instead of one hour, you get four hours with semi-habituated gorillas in a group of just four visitors (compared to eight on standard treks). The permit costs $1,500 in Uganda.
For photography, the extra time is significant. You can wait for better light, try different compositions, and observe behavior before shooting. But practitioners report that it is not always superior. One traveler on a habituation experience found that the silverback was skittish and kept moving the family uphill, allowing only brief photography windows. In contrast, the fully habituated family they visited on a standard trek sat calmly for the final 15 minutes while juveniles played and groomed. The takeaway: habituation offers more opportunity but no guarantees.
Habituated Gorilla Family
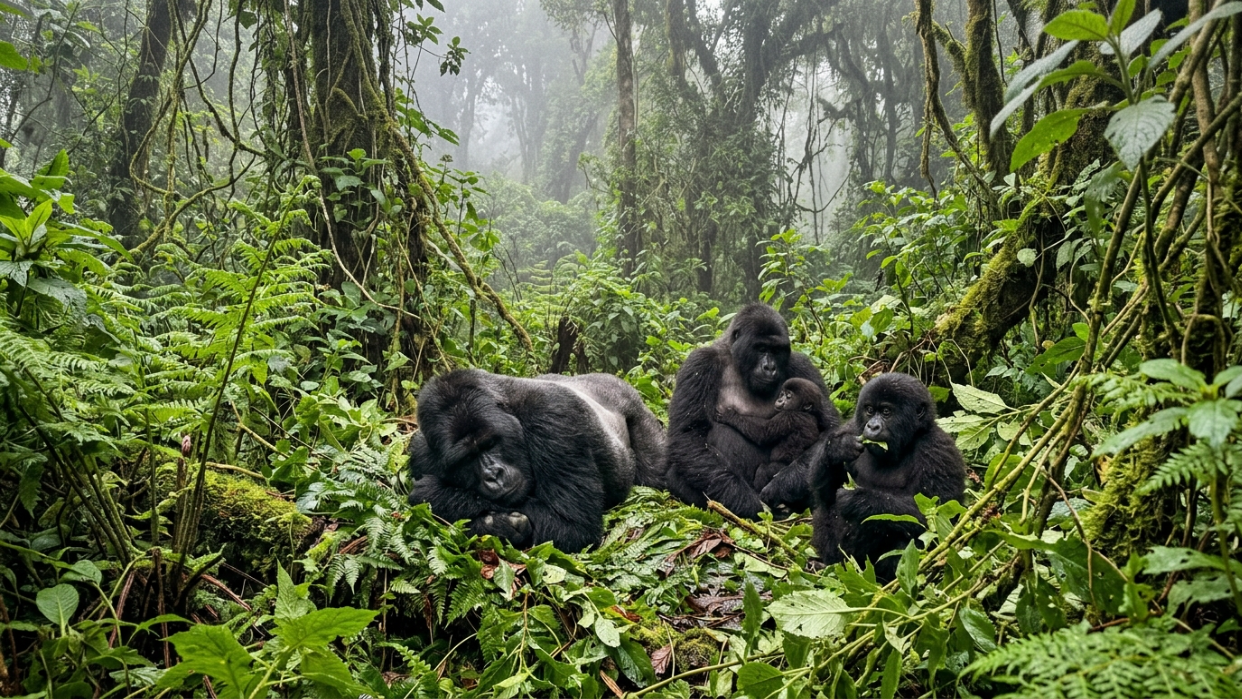
A gorilla group that has been gradually conditioned to tolerate human presence through years of daily visits by researchers and rangers. These families are comfortable around people and behave naturally during visits, making them far easier to photograph. The habituation process takes two to three years per family.
Maximum Group Size
Eight visitors per gorilla family per day on standard treks. Four visitors for the Gorilla Habituation Experience. These caps exist to minimize stress on the gorillas and are non-negotiable.
Minimum Trekking Age
Fifteen years old in both Uganda and Rwanda. No exceptions. This applies to the gorilla trekking age limit for both standard permits and habituation experiences.
No-Touch Policy
You may not touch the gorillas under any circumstances, even if a juvenile approaches you. Physical contact risks disease transmission between humans and gorillas (they share roughly 98% of our DNA) and can alter their behavior toward future visitors.
Commercial Filming Permit
If you intend to use your footage commercially, whether for a documentary, stock footage, or commercial marketing, you must apply for a separate filming permit through the Uganda Wildlife Authority (UWA) or Rwanda Development Board (RDB). These permits carry additional fees, require advance application, and come with oversight requirements. Standard trekking permits cover personal photography and video only.
Location and Seasonality Glossary
Bwindi Impenetrable National Park (Uganda)
Home to nearly half the world’s mountain gorillas, this UNESCO World Heritage site is often considered the top choice for serious gorilla trekking photography. The dense forest and mist-covered hillsides create atmospheric, moody images. Bwindi has multiple trekking sectors (Buhoma, Ruhija, Rushaga, Nkuringo), each offering different terrain and gorilla families. The “impenetrable” in the name is not marketing. The vegetation is genuinely thick, which affects both the difficulty of the hike and the light conditions for photography.
Explore all the options in our guide to Uganda destinations and gorilla trekking.
Volcanoes National Park (Rwanda)
Made famous by primatologist Dian Fossey, this park sits in the Virunga mountain range and offers an arguably easier trekking experience than Bwindi due to less dense vegetation. The bamboo-forest terrain allows more light to reach the forest floor, which can produce better-lit gorilla photography conditions. The trade-off is the $1,500 permit price, nearly double Uganda’s standard rate.
Mgahinga Gorilla National Park (Uganda)
Uganda’s smallest national park, located in the Virunga range. It offers the possibility of photographing gorillas with volcanic peaks in the background, a composition that is impossible to get in Bwindi. Mgahinga has fewer gorilla families available for trekking, so availability is more limited, but the scenery is dramatic.
Mountain Gorilla
The subspecies (Gorilla beringei beringei) found only in the Virunga volcanic range and Bwindi. The global population has recovered from approximately 254 individuals in the 1980s to around 1,063 today. They are classified as endangered on the IUCN Red List, reclassified from critically endangered in recognition of the population recovery. A 2025 census in Bwindi is currently underway to update these numbers.
Silverback
The dominant adult male gorilla, identifiable by the distinctive silver-grey saddle of hair across his back. Silverbacks can weigh over 400 pounds and are typically the most photogenic subjects, combining raw physical presence with intense, watchful eyes. They are also the most alert to human visitors, which means eye-contact shots with a silverback carry particular emotional weight.
Dry Season vs. Wet (Green) Season
Conventional wisdom says the dry seasons (June through September and December through February) are best for gorilla trekking because trails are less muddy and hiking is easier. But for photography specifically, award-winning primate photographer Nelis Wolmarans of Pangolin Photo Safaris actually recommends avoiding the dry season. Overcast skies during the wet season produce soft, even light that eliminates harsh shadows, makes eye-contact portraits more emotive, and reduces the extreme contrast that plagues forest photography. The wet season also brings greener vegetation, adding richer color to environmental portraits.
For month-by-month guidance, our best time for gorilla trekking guide breaks down what to expect in each season.
Uganda vs Rwanda for Gorilla Photography
|
Factor |
Uganda (Bwindi) |
Rwanda (Volcanoes NP) |
|---|---|---|
|
Permit Cost |
Lower |
Higher |
|
Forest Density |
Dense rainforest |
More open bamboo forest |
|
Photography Light |
Darker, moodier |
Brighter and cleaner |
|
Trek Difficulty |
Often harder |
Usually easier |
|
Atmosphere |
Wild and immersive |
More accessible |
|
Best For |
Dramatic rainforest portraits |
Cleaner visibility and easier shooting |
Uganda generally produces more atmospheric rainforest imagery, while Rwanda offers easier photography conditions because more light reaches the forest floor.
Gorilla Trekking Photography Packing Checklist
Most first-time gorilla trekkers focus entirely on camera gear and forget the accessories that actually protect equipment in the rainforest.
Essential Photography Gear
-
Camera body
-
70-200mm f/2.8 lens
-
Extra batteries
-
Multiple memory cards
-
Rain cover for camera
-
Microfiber cloths
-
Dry bag or waterproof pouch
-
Lens hood
-
Cleaning blower
Optional but Helpful Gear
-
Second camera body
-
Lightweight monopod (if permitted)
-
Smartphone gimbal
-
Wide-angle lens for environmental portraits
-
Portable SSD for backups
-
Power bank
What NOT to Bring
-
Large tripods
-
Flash units
-
Oversized hard camera cases
-
Heavy multi-lens setups
-
Drone equipment (generally prohibited)
Rainforest trekking is physically demanding. Every extra pound becomes noticeable after several hours on steep muddy trails.
Practical Preparation Glossary
Porter
A local hire who carries your daypack and helps you navigate steep, slippery terrain during the trek. Porters typically cost $10 to $25 for the day. For photographers carrying heavy camera equipment, hiring a porter is not a luxury; it is a necessity. Keeping your hands free means you can have your camera ready at all times and focus on your footing rather than your 15-pound backpack.
If you are wondering how demanding the hike itself is, see our guide on fitness for gorilla trekking.
Pre-Trek Briefing
A mandatory orientation session held at the park headquarters before each trek. Rangers explain the rules (distance, flash ban, time limit, behavior around gorillas), assign you to a gorilla family, and may check your camera settings. This is your last chance to ask questions and verify that your flash is off, your burst mode is set, and your ISO is where you want it.
Silent Shooting Mode
A camera setting (available on most mirrorless bodies) that uses an electronic shutter instead of a mechanical one, eliminating the “click-clack” sound. While gorillas habituated to visitors are generally unbothered by shutter noise, reducing sound is a courtesy and a precaution, particularly around silverbacks or mothers with young infants.
Lens Changing (Avoid Mid-Encounter)
Switching lenses in a tropical rainforest exposes your sensor to moisture, dust, and debris. Do it during the encounter and you also lose precious seconds of your one-hour window. Choose your lens before you reach the gorillas and commit to it. If you absolutely must carry a second lens, keep it in a sealed bag and accept that switching will cost you shooting time.
One photographer on a forum shared a telling experience: despite bringing two bodies with a 24-70mm and a 75-300mm, they wished they had brought their 100-400mm instead. The gorillas were resting in an area that was difficult to photograph from the available angles. The lesson is that gorilla behavior is unpredictable, and no lens choice is perfect every time. Pick the most versatile option (the 70-200mm f/2.8) and work with what the gorillas give you.
Smartphone Photography
Surprisingly viable. One photographer reported that some of her best gorilla images came from an iPhone, noting that phones excel at wide-angle photography during close encounters. Because gorillas regularly break the 7-meter rule by approaching visitors, there will be moments when a phone is not just acceptable but actually better suited than a telephoto lens for capturing the intimacy of the experience. Use your phone for video and wide-angle context shots while your main camera handles portraits.
Quick-Reference Settings Card
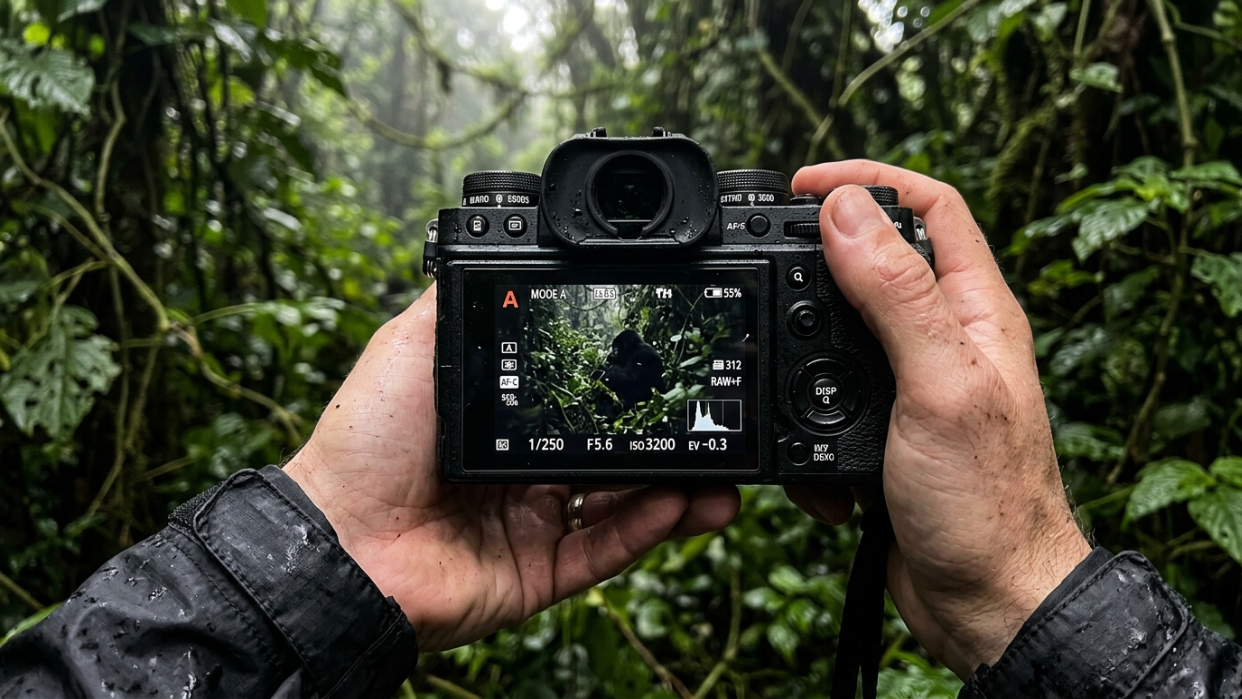
Before your trek, set your camera to these starting values and adjust from there:
-
Mode: Aperture Priority
-
Aperture: f/2.8 to f/4.0
-
ISO: 800 to 3200 (or Auto ISO with 1/250 minimum shutter speed)
-
Shutter speed: 1/250 second minimum
-
Exposure compensation: Start at -1, adjust to -2 if needed
-
Autofocus: Continuous (AF-C or AI Servo), Animal Eye AF if available
-
Drive mode: Burst / Continuous shooting
-
Flash: OFF (mandatory)
-
White balance: Auto or Cloudy (shoot RAW for full control later)
-
Image stabilization: ON
Common Gorilla Photography Mistakes to Avoid
Shooting Too Wide Open All the Time
Many photographers automatically shoot at f/2.8 for every frame. While this helps in low light, it can make only one eye sharp while the rest of the face falls out of focus. In many situations, f/3.5 or f/4 produces stronger portraits.
Underestimating the Darkness
Rainforest light is much dimmer than most visitors expect. Many first-time trekkers arrive with slow kit lenses that struggle under the canopy. Fast lenses matter more than extreme zoom range.
Constantly Changing Lenses
Lens changes waste time and expose sensors to moisture and debris. Most experienced gorilla photographers use a single lens for the entire encounter.
Ignoring Backgrounds
A gorilla portrait can fail because of distracting branches behind the subject. Shift your position slightly and use longer focal lengths to create cleaner backgrounds.
Taking Too Many Photos
Some visitors spend the entire hour holding the shutter button. The best images usually come from patience and observation rather than nonstop shooting.
Forgetting to Experience the Moment
Many photographers later realize they barely looked at the gorillas directly. Spend part of the trek simply watching behavior without the camera pressed to your face.
Frequently Asked Questions
What is the best lens for gorilla trekking photography?
The 70-200mm f/2.8 is the near-universal recommendation among professional wildlife photographers and experienced gorilla trekkers. It offers enough reach for portraits at the 7-meter minimum distance while maintaining a wide maximum aperture for the dark forest conditions. If you have a crop sensor camera, a 70-200mm gives you effective reach of 280-320mm depending on your brand.
Can I use flash when photographing gorillas?
No. Flash photography is completely banned during gorilla encounters in Uganda, Rwanda, and the DRC. Flash can startle gorillas, provoke defensive behavior from silverbacks, and disrupt the entire family. Rangers may check your camera settings before the trek, and using flash during the encounter can result in your visit being terminated.
Is a smartphone good enough for gorilla photography?
A smartphone can produce excellent results, particularly during close encounters when gorillas approach within a few meters. Phones handle wide-angle shots and video well. They won’t replace a dedicated camera for telephoto portraits or low-light performance, but they are a worthwhile backup and sometimes capture the most intimate moments of the experience.
Should I choose the Gorilla Habituation Experience for better photos?
The four-hour habituation experience offers more time and smaller groups (4 vs. 8 visitors), which creates more photography opportunities in theory. In practice, semi-habituated gorillas can be skittish and move quickly, limiting shooting windows. Standard treks with fully habituated families often provide calmer, more relaxed subjects. Consider the habituation experience if you want a longer, more immersive encounter, but don’t assume it automatically produces better photos.
Is the dry season or wet season better for gorilla trekking photography?
This depends on your priorities. Dry seasons (June to September, December to February) offer easier hiking and less mud. But for photography specifically, the wet season’s overcast skies produce softer, more even light that is ideal for portraits. Award-winning primate photographer Nelis Wolmarans specifically recommends avoiding the dry season for gorilla photography, noting that cloud cover creates more emotive images.
How close can you get to the gorillas?
The official rule is 7 meters (23 feet) minimum. However, gorillas don’t follow this rule. Juveniles may walk past you, and silverbacks sometimes move through the group of visitors during feeding. When a gorilla approaches, hold your ground quietly. Do not reach out or attempt to touch them.
What should I do if my camera can’t handle high ISO well?
Shoot in RAW format and use modern noise-reduction software in post-processing. Adobe Lightroom’s AI denoise tool can salvage images shot at ISO 6400 or higher with impressive detail retention. Also consider renting or borrowing a more capable camera body for the trip, given that the permit alone costs $800 to $1,500.
How can I make the most of the one-hour time limit?
Arrive with your camera fully set up and tested. Hire a porter so your hands are free. Spend the first 10 minutes observing without the camera to understand the gorillas’ movements and positions. Then shoot with intention for the remaining 50 minutes, varying between tight portraits and wider environmental shots. Use burst mode during active moments and be patient during calm ones, waiting for eye contact and natural interactions.
Next Steps
Gorilla trekking photography combines the technical demands of low-light wildlife shooting with the logistical complexity of permits, regulations, and multi-hour jungle hikes. Knowing the vocabulary, from aperture priority to the 7-meter rule, means you show up prepared rather than guessing.
The three things that matter most: bring a fast lens (70-200mm f/2.8), dial your exposure compensation to -1 or -2 for black fur subjects, and spend your first 10 minutes watching before you start shooting.
If you are planning a gorilla trek and want help with permits, itineraries, and logistics across Uganda and Rwanda, explore our Uganda gorilla safari trips for pricing and planning details. And if gorilla trekking is part of a bigger East Africa adventure, our guide to fitting multiple experiences into one trip can help you combine safaris, trekking, and beach time into a single itinerary.